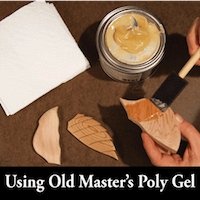
Using Old Master's Gel
Over the years we have worked hard to perfect the finishing process we recommend. The purpose of this article is to share what we have learned thru trial and error. We found it best to apply the finish before the parts are glued down.
Surface Preparation:
All surfaces must be dry and as dust free as possible. We use an air compressor to blow each piece off before applying the first coat of gel. Application: Stir the gel thoroughly before and during application. Do not apply in direct sunlight or areas of extreme air movement. A good tip to keep the gel from drying out while you coat the pieces is to open the can, turn the lid upside down and put a small amount on the inside of the lid. Place the lid on top of the can and refill as needed. This keeps air from drying the surface of the exposed gel. Because the gel is very thick and it soaks into the wood it works best to apply the gel one piece at a time. We use a 1” foam brush to apply the gel and Bounty paper towels to wipe each piece clean.

First Coat:
Apply the gel to the sides and top, leaving the bottom free of finish so the glue will hold the pieces firmly to the backing. Applying the gel to the sides and top will help seal the wood, protecting your piece from the ever-changing climates. If the gel is left on too long before wiping off, drying time increases and the sides could remain tacky. It is VERY important to use a clean paper towel (or a clean part of the towel) for each piece. This eliminates “cross contamination” which may increase the chances of a tacky surface which will extend the amount of time needed to dry. Also continued use of the same paper towel will cause the towel to break down and leave more lint.

Second & Third Coats:
Applied to the top surface and outside edges only. Apply gel to surface, wipe quickly with a clean cloth. Buff lightly with another clean cloth, working in the direction of the grain until the surface is smooth and your paper towel comes away with no residue. Three coats are what we recommend; however, additional coats will enhance and provide greater protection. Sanding between coats is not necessary as long as you buff each piece until no residue is left on cloth. Occasionally the gel raises the grain on aspen. We use a 4/0 steel wool between the second and final third coat.
Drying Time:
Drying time will be affected by temperature, humidity and thickness of the gel. Most oil-based varnishes dry upon exposure to air, which is also known as “oxidative cure.” We use a small oscillating fan set on low about 4 feet away from drying project pieces. This is especially helpful in areas with higher humidity levels. We also have a dehumidifier running at all times. It is the oxygen molecules in the air that interact with the gel, creating a chemical reaction that causes the gel to dry. We recommend at least 8-10 hours between the first and second coats. Less time (6-8 hours) is needed between the 2nd and 3rd coats.

9 Responses
Judy
JEAN DEMPSTER
March 08, 2021
I’m making an outdoor piece and I see that both the Quick and Thick glue and the Old Masters Gel Polyurethane finish are only recommended for interior use. What products do you use on outdoor pieces?
I haven’t created that many outdoor pieces, but definitely would find outdoor versions of the two. I wish I could offer more information.

Doug Anderson
To avoid yellowing, I have always used a clear lacquer. Especially on my lighter woods (eg, aspen)
Will the poly not yellow these lighter woods over time,
Thanks

Albert. Kleyn
Nice wook

Jean Dempster
I’m making an outdoor piece and I see that both the Quick and Thick glue and the Old Masters Gel Polyurethane finish are only recommended for interior use. What products do you use on outdoor pieces?
Judy Roberts
MIKE CLARK wrote "And then after gluing, spray with laquer as normal?
No, the gel is the finish. It is applied before gluing. No need to apply more finish like lacquer.

Roger Ransom
I’ve been doing Intarsia since my class several years and never noticed this tutorial. I’ve been using Old Masters gel but my finishes left something to be desired. After reading this I changed several of my procedures and my finishes have made a huge improvement.
Thanks so much -

Judy Roberts
Mike Wrote;
And then after gluing, spray with laquer as normal?
I apply finish to each part individually before gluing them to the backing. I used to glue first then apply the finish but found it was harder to get the finish smoothly one all the pieces, especially if spraying a finish. The high areas will get too much, the recessed areas will not get enough. When I used to spray after gluing – dust always seemed to appear from somewhere.

Mike Clark
And then after gluing, spray with laquer as normal?
I cannot help but wonder how many trials and retries you took to settle on this.
Leave a comment
Comments will be approved before showing up.


Judy Roberts
Author