Gluing Intarsia Tips
Many people have shared with me their frustrations with gluing their projects down. “It fit so good until I started gluing it, I don’t know what happened”. I understand the feeling, after over 35 years of experience I have had just about every problem imaginable.
 Make a "custom" backing:
I trace around the finished project onto a piece of white paper. It’s helpful to spray a light coat of spray adhesive to keep the parts from sliding all over the place. I glue this tracing/pattern to the tempered hardboard. When cutting the backing stay about 1/16” inside the line. I use 1/8” tempered (on both sides) hardboard (also known as Masonite). This has proven to be a very stable product, plus the darker color helps to minimize the backing.
Below are the techniques that I use on all my projects:
I always glue the parts onto a backing, I never edge glue parts; here's why:
• You can give a little space between parts that were cut and put back together.
• If parts don't fit perfectly a little space between them makes it less noticeable. This space also helps with shrinking and expansion.
• If you have any parts that are cut into sections then put back together (like the dark parts of the cat's face) you loose wood with each cut. Gluing the parts to the backing lets you evenly space parts like these. Edge gluing them will make a gap somewhere.
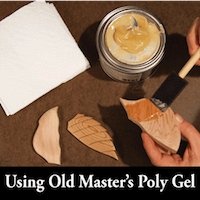
• Applying the finish before gluing the parts down will help ensure the parts are sealed properly. We put a coat on the surface and all the sides, not on the bottom of the parts. We put three coats of polyurethane gel before gluing the project down. An added benefit to applying the finish first is if you get a drop of glue on any of the parts it wipes off very easily.
I have been using Titebond Quick & Thick Glue. It is the thickest, fastest-drying glue available for use with porous and semi-porous materials. The glue provides a strong initial tack and fast speed of set, yet allows realignment of working pieces. It also develops a bond stronger than the wood itself and it is very flexible which allows for some shrinking and expansion.
CA glue is not very forgiving, I rarely use it. I only use it for spalted wood that needs a thin glue that will soak in to give it strength.
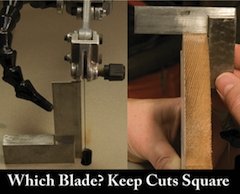
Problems with Edge Gluing:
• Gluing parts that are not cut square will cause more fit problems.
• It will "magnify" parts that do not fit very well.
• Very hard to get a good bond between thin parts.
• Edge gluing makes it hard to apply a finish to the project.
Not to mention the stress problems the wood encounters with humidity fluctuations. Wood shrinks and expands with the humidity. If you edge glue pieces of wood with opposite grain directions there is a very good chance one part will split.
First make sure everything fits on the backing. Take the time to check all sides to make sure none of the backing is exposed. Then I glue a few outside edge parts to lock in the entire project.

I use the glue sparingly, a little glue goes a long way. Excess glue can cause the parts to “float” to one side or the other.
On the cat in the box I chose the large lower left side of the box. This is an easy part to remove without upsetting the placement of the rest of the parts.

On the Triggerfish I glued the exterior fins and tale, as mentioned above, these parts are easy to remove.
After gluing these parts let the glue set up.
Having a few pieces locked in will help keep things from shifting as you glue the rest of the project down.

Next I glued the right box lid behind the cats ear. I glue all the parts that are not raised with a shim.
Then I remove the parts and shims and glue them one shim at a time. The last shim is “Rx3” under the nose of the cat. ![]() After gluing these parts you have a little time to space the parts as needed. Whenever you cut up sections like the cats eyes out of the same piece of wood the kerf of the saw blade (even using a 2/0) removes some wood from the parts making them a little smaller. If you have lots of cuts like this you need to allow a little space between the parts otherwise the adjoining parts will not fit properly.
After gluing these parts you have a little time to space the parts as needed. Whenever you cut up sections like the cats eyes out of the same piece of wood the kerf of the saw blade (even using a 2/0) removes some wood from the parts making them a little smaller. If you have lots of cuts like this you need to allow a little space between the parts otherwise the adjoining parts will not fit properly.
 Recently I tried using some double-sided tape to hold a few parts in place before I started gluing the project down. The tape held things together while I glued some of the exterior pieces.
It does help, especially with projects like the moose. It made it easier to hold those antlers in place as I glued the ears and parts of the neck to "lock in" the project.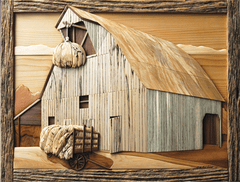
There is no fool proof way to glue things down without some human error. It seems like most of the people that make Intarsia are perfectionists (it takes one to know one) and we still point out everything that is wrong with the piece when we show it to friends.
To make up for the wood lost when there are lots of cuts within the same part, like the boards on the hay barn, use some thin card stock paper cut in strips to evenly space the pieces. If I edge glued all those pieces I would have a gap on one side or the other. The line (space) helps to define each board on the barn, or between parts like the Lipizzan horse below.


9 Responses
Judy
I have a question, when gluing it is typical to glue the pieces to a backboard, however, I want to incorporate the intarsia into my regular woodworking, The head of a chair, side of a case, riser board on a bookshelf, etc. What problems should I expect? Any tips for how best to accomplish this? Special glues, finishes sanding to consider. I was thinking of recessing a pocket 1/8" to 1/4" deep and inserting the intarsia in it.How should I consider wood movement on the pieces?
I haven’t tried inlaying in furniture, I imagine it would be the same. I would do all the sanding of the individual parts, apply finish to the parts (except the side that will be glued) then glue the parts in place. I’ve glued pieces on a door before and used this same technique.
Judy
Hello, when you say tempered on both sides for the backing material do you mean smooth on both sides ? The hard board they have at home depot has a waffle board pattern on one side.
Thanks Brian
Brian, yes it’s smooth on both sides.
Judy
ELAINE BERG
December 09, 2020
My question is, do you leave the pattern glued to the backing board after you cut it out. Or do you remove the pattern before you glue the pieces down?
I remove the pattern before gluing, I have used some tracing paper to transfer some lines onto the backing to help with gluing.
Judy
VICKI
December 19, 2022
I am creating 22" t by 16" wide faux intarsia out of poplar. Any suggestions for keeping them from bowing? Thanks for the help
First make sure your wood is dry, where I’m located in E. TN I can get to about 9% moisture. The other thing that will help is do not sand thinner than 1/4", really 3/8" is the safest thickness to keep wood from warping.

Vicki
I am creating 22" t by 16" wide faux intarsia out of poplar. Any suggestions for keeping them from bowing? Thanks for the help

Elaine Berg
My question is, do you leave the pattern glued to the backing board after you cut it out. Or do you remove the pattern before you glue the pieces down?
Look forward to hearing from you.

Brian Kellogg
Hello, when you say tempered on both sides for the backing material do you mean smooth on both sides ? The hard board they have at home depot has a waffle board pattern on one side.
Thanks Brian

Mike
I have a question, when gluing it is typical to glue the pieces to a backboard, however, I want to incorporate the intarsia into my regular woodworking, The head of a chair, side of a case, riser board on a bookshelf, etc. What problems should I expect? Any tips for how best to accomplish this? Special glues, finishes sanding to consider. I was thinking of recessing a pocket 1/8" to 1/4" deep and inserting the intarsia in it.How should I consider wood movement on the pieces?

Dale Shadlow
I have a request to enlarge your 50"eagle to 72". My concern is the backing, keeping it from warping. Any ideas?
Leave a comment
Comments will be approved before showing up.


Judy Roberts
Author