Wonder Wheel Help
What is a Wonder Wheel and How Do You Use It?
The Wonder Wheel can be used to add texture to Intarsia projects.
- The wheel is 6” diameter and 1/2” wide.
- The 1/2” wide surface is flat when it arrives from the factory (shown right).
- Use a wheel dresser to dress the edge to a "V" point for most textures.
- The Wheel needs to run at least 3450 RPM, 4000 RPM maximum speed.
- It is important to follow the rotation arrows on the wheel.
 The wheel has a 1" diameter opening. It will need a reducer bushing to attach it to your motor. We sell a "Telescope" Reducer Bushing that will reduce the 1" mounting hole down to 1/2" or a 5/8" depending on the size needed. Most 8" bench grinders have a 5/8" shaft, 6" bench grinders have a 1/2' shaft.
 The 1" opening on the wheel has a bevel which makes it hard to keep the bushings in place. We add a 1 1/4" washer in between the wheel and the wheel flange (came with the grinder). If you have stamped reducer bushings you can use some double-sided tape to keep the bushings from shifting on your motor shaft.
 The “V” shape seems to work for most textures. Using firm pressure you will sand the sides to a point or a “V” shape.
 Keep moving the dresser or sandpaper. Once you have the “V” shape it will not take as long to re-sharpen it.
View a video dressing the edge of the Wonder Wheel.
The wheel will burn and polish dowels or any piece of wood used for eyes. To get the best results go with the grain as much as possible. Once you have a sharp corner it will need to be re-sharpened from time to time using the flat board with the sandpaper stapled to it. If you find the wheel dances around, or is hard to make it go where you want it to, it may need to be re-sharpened.
 View a YouTube adding a fur-like texture with the wheel.
As far as using the wheel for various textures, for example, a bears rougher coat. I would make a series of short deep strokes, keeping the wheel sharp to make chisel type grooves. On a project with a soft coat like on a Collie or a horses mane, I let the wheel get a little more round and make long, flowing strokes. The amount of pressure applied important also. It doesn't take a lot of pressure to make a texture that will show up. Putting texture on a bear you may want to apply very little pressure around the eye and nose area to give the impression of a smoother coat. As you get to the sides of the face you can add more pressure which will make it look like a coarser, thicker coat. The texture is a nice contrast to all the smooth pieces of wood. When I add texture I basically cover the entire surface with a series of grooves.
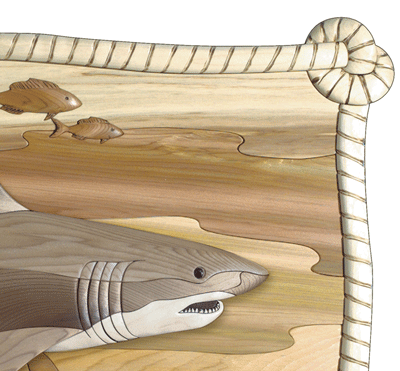
It works great for adding detail for a rope on the I-167 Great White Shark pattern. The white wood is aspen, the burn from the Wonder Wheel really helps define each rope segmnt. When I add texture I like to continue the texture around any exposed outside edges.
There are some limitations, it is impossible to make tight circular lines, it is best to make a series of dashes in the circular direction to achieve the curved lines as shown on the elephant.

The Wheel can define areas like the feathers as shown on the wing. This saves time by eliminating the need to cut each segment of rope or each feather.
The fronds on the palm branches and the texture on the trunk of the palm were created using the wheel.
The burnish doesn't have as much contrast on the light to darker shades of wood. It may appear to have more contrast however, as soon as the finish is applied there will be less contrast.

The photo on the left shows putting texture on a donkey ear. It is rounded toward the inside cut out area, you can only texture so far in before you hit the other side of the ear. If the diameter of the wheel is larger than the dip, sanded in the wood, there is no way the wheel can texture inside the dip.
In the above elephant photo there is a slight dip above the elephants eye (the darker part toward the top of the head). I was not able to get the texture in the lowest part of that dip.
