Copy of FAQ
We have answers to the most frequently asked Intarsia questions below. If you don’t find the answer you are looking for here please feel free to call or email.
Q: I am having a hard time figuring out what is light, medium light, medium dark, and dark? 
A: Each project that I make the shades can vary. What I call dark on one project may be medium dark on another, that is because the medium dark may be the darkest piece of wood I have at that time. I start with what is the darkest shade of wood I have, then look for progressively lighter shades from that. Or you can go the opposite direction, pick what is your lightest shade down to the darkest. The white is the easiest, I use aspen for the white wood. I have a project that I have marked what shades I call light, medium light, medium, medium dark and dark.
Q: I can't find Western Red Cedar (WRC), do you know of a mail order place to get it?
A: One of the many reasons we use Western Red Cedar is that is so widely available. We do not mail order the WRC and at this time do not know of a mail order source. However, here are a few tips if you are looking for a source for Western Red Cedar. Call around to lumber yards and ask for “Western Red Cedar”. Do not ask for “Red Cedar” because they are two different types of wood. Red cedar is the cedar that you use in cedar chests, etc. We do not use the Red Aromatic Cedar. The WRC we use comes from Canada and Washington State as well as a couple other states. WRC is mainly used for exterior purposes. Lowe’s and Home Depot also carry some WRC but at times lacks the nice colors we look for. Try calling or visiting locally owned lumber yards. You can even ask for Cedar Fence Pickets. The 1″ X 6″ pickets can be very beautiful. The WRC we buy is “S3S” which is finished on 3 sides. We often hear the comment “I can’t find that beautiful cedar” that you use. Guess what ? We use the lowest grade we can find and that is where the gold mines lay. Our WRC is also green when we buy it and has to be dried. A good rule of thumb when drying WRC is 6 weeks for a 1″ board and 6 months for a 2″ board.
Q: Can I use hardwoods or exotic woods?
A: The color and grain are more important than the species of wood used. It is a good idea to have a combination of straight grained wood as well as some highly figured wood to accent areas. We have shades marked on our pattern (D-Dark shade of Wood, M- Medium shade of wood, etc.), any type of wood will work. On most projects you will need 4 to 5 shades of wood from a white wood to a dark wood. When you are just getting started there is nothing wrong with using some stains. It can take a while to build your “pallet of colors”.
Q: What kind of white wood do you use?
A: We use aspen for our white wood which stays pretty white. If you can’t get the aspen you might want to put one coat of “whiting” on the part as the first coat. We have white “Old Masters” on the hardware page that folks use for this purpose. First coat of white and then two coats of the “Old Masters” clear. Too many coats of the white will make the wood look too white and almost painted. You should always test on scrap piece of wood first. You can make your own white by using artist oil colors and mix it with some of the clear gel. You can also use colors with great results. Just pull some clear out of the can and put it in a baby food jar or something like that with a lid that seals. Add some titanium white oil color (in a tube) and mix it up. Start with a little and mix then test and keep adding until you get the results you want. Remember that too much of the white will make your part too white and look “painted”.
Q: Can I sell the projects I make from your patterns because of their copyright?
A: Yes you can as long as you are the one making the projects on a personal level. If you are going to “manufacture” or have our designs “mass produced” then you will have to obtain a license to do so. We do not deal with licensing personally but do have an attorney that will negotiate for us. All you will have to do is have your attorney contact ours. Our attorney will not talk to an individual on this subject. You may not have copies of the patterns made and re sell them– that is against the law.
Q: Can I have copies made of a pattern that has a copyright on it?
A: Yes you can have copies made. Most people are making multiple copies of the pattern and cutting the pattern pieces to glue on the wood for sawing the parts. You can use carbon paper to transfer the parts onto the wood, however cutting and pasting the actual pattern onto each color of wood is going to be the most accurate method. We found 6 copies will be enough for most projects. The pattern copies cannot be sold. They are for the buyers use only. On each invoice there is a release for the patterns purchased on that particular invoice. Take the invoice with you. Many times we will receive a copyright release form faxed to us from copy shop, we will sign it and fax it back. Fax Number (865)428-7870
A: Use this link to hear that high C note, as you listen you do not need to click for the next slide. Sounds of blade tension link
Tighten your blade until it makes a high C note when you pluck it. Each saw is different, if you still have your manual read what the manufacturer suggests about how to tension your blade as well as how to install it. If you do not have the manual a quick search on the internet may be a good idea. If you do not put the blade in correctly it will break. If it breaks at the top, chances are you haven’t installed the blade correctly in the upper blade clamp. If it breaks at the bottom, check to see that it is installed right in the lower blade clamp. If it breaks in the middle, you probably have the tension set pretty good, but you are feeding your wood into it with too much force. So slow down a little bit. If your tension is not tight enough your blade will drift and follow the grain of the wood. It may flex when you are turning corners and cutting curves. Flexing will cause your cuts to be out of square, usually wider on top than on bottom.
A: Well – Scroll saws really run the full range of price, and the old saying is true here. “You get what you pay for” (more or less). For our type of work there just is not a saw in the $100.00 to $150.00 price range that will preform for us day in and day out. Prepare to pay some money for your saw but it is well worth it in the end. I like sawing and it is a pleasure to saw on something that runs smooth and accurate. We use the new Seyco (link to Seyco Saw) scroll saw and Excalibur saws. We have two Seyco 21" saws, eight 21″ Excalibur saws, and two Eclipse saws. Dewalt is a good mid range priced saw (link to Dewalt).

A: The kind and size of scroll saw blades can vary from one user to the next. What
works for me here in the studio may not work as well for you on your saw. I have a certain “feel” that I like when sawing and that can be different than what you like. A universal size 5 works for most intarsia projects. If I cut back into the same part to split it up into smaller sections that will go back together I will put in a very small blade size (2/0 or 0). One thing for sure (as far as I am concerned) there is not one blade that is good for everything. The blade that I use for our Intarsia on Western Red Cedar is not the blade that I use on plywood, nor is it what I would use for harder woods. I use different blades for different things. Then there is the “How Thick is the Wood”, is another factor to consider. All in all, there is only one way to figure this out. Get an assortment of blades and a stack of material and start sawing. Experience is the best way to figure this out. Below is a chart with different blades and sizes that are just a starting point. This is the actual blade combinations that we use when sawing, but the ones that you like best might differ from ours. Just remember to Experiment to determine the. blade that cuts best for you Another question is how long a blade will last? When the blade gets dull it will not cut well, you may find yourself pushing the wood too hard into the blade causing the cuts to be out of square. If the thought crosses your mind “I wonder if the blade is dull” it probably is. After you change the blade you will notice right away how much easier it is to cut your pieces. We can help you get started with blades but in the end you will have to decide for yourself. Below is a list of the blades we use. You can order the “OnLine” blades on the Scroll Saw Blades Page, just click on this link.
 Tough Little Blades are a "all around blades for hard & soft woods. Quick cutting blade for all types of wood. Skip tooth; offset teeth for a more problem-free cutting of curves. Very long durability due to special hardening;
  Gold Blades are a quick cutting saw blade - works best with softer woods. Best quality; Skip tooth; very long durability due to special hardening; Reverse teeth will prevent wood splintering on the underside.
 Platinum Blades are a quick cutting blade for all types of wood. Extremely sharp teeth and a strong back for best performance and long life. The Skip tooth design for a rapid discharge of sawdust so that no blue burn marks are left on the wood in tight radius cuts. Reverse teeth prevents wood splintering on the underside.
 TMR Titanium Reverse Skip Tooth quick cutting saw blade, has a positive cutting angle which makes it more aggressive, no drifting of the cut, extremely long life due to special hardening in oil.
 TM (non reverse) has more TPI along with the positive cutting
angle makes it a aggressive cutting blade.

Platinum Plus These blades work well for medium to hard woods. This high-speed skip tooth blade, every 3rd tooth is reversed to prevent wood splintering on the underside. The tooth configuration allows for more control going thru curves.

Click for Scroll Sawing Tips
A: The best place to start is sawing right down the middle of the pattern line. Of course this will vary depending on the size of blade you are using. When using anything over a #5 you should try to be a little to the outer edge of the pattern line. With more practice you can learn to cut and leave half of the pattern line.
We never cut parts over the line with the intention of sanding to the l

ine after it is cut out. This can lead to a host of problems the main problem is keeping your parts square.
Check your saw table to make sure it is square with the blade. Also use a square to check your parts often.
Q. Can I use a band saw?
A: Most of the patterns are designed for either saw, we used a band saw for about 10 years. Half of the pattern projects shown were cut out using a band saw with an 1/8" blade. The scroll saw will make a much smoother cut.
Q: What is a Wonder Wheel?
A: The Wonder Wheel is an abrasive wheel that works best on a bench grinder that goes at least 3450 rpm. The Wonder Wheel is flat. You can use a Diamond Wheel Dresser to sharpen it. Click here to see a video for sharpening your Wonder Wheel. For more detailed instructions about using the Wonder Wheel click on this link. 
Q: How do you set up the Flex Drum Sander and the Wonder Wheel?
A: If you have limited space and want to have one unit for your Flex Drum Sander and the Wonder Wheel you can buy a variable speed bench grinder. The key word here is VARIABLE. Turn the speed down to the lowest speed when using the sander, turn the speed up to the highest speed for the wheel. I suggest getting the 8″ variable speed grinder, the motor is larger and will have more power when sanding. There are many different companies that make the grinders (Sears, Delta, Porter-Cable). When you buy the grinder you will need to take off all the guards, grinding stones, and other attachments. The Flex Drum Sander arbor fits directly on the motor shaft, so does the Wonder Wheel. Depending on the size of the motor, the shaft can vary in size. On most 8″ variable speed bench grinders the shaft is 5/8″, on 6″ grinders it may have a 1/2″ shaft. The Flex Sander will fit the 5/8″ shaft and attach with a couple of set screws. It comes with a split reducer bushing to fit the 1/2″ motor shaft . The Wonder wheel has a 1″ mounting hole, you will need to get either the 1/2″ reducer bushings or the 5/8″ bushings depending on the size of the motor shaft to run the wheel. We do have these available on the hardware page.

Pictured above is the grinder stripped down. The arbor will then slide onto the shaft.
If you have a motor with a 1/2″ shaft you will need to use the split reducer bushing.
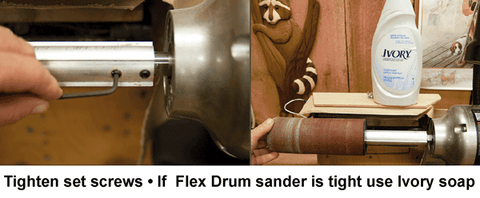
You will then tighten the set screws. If you have trouble sliding the sanding
sleeve onto the arbor you can use a small amount of dish soap.

When using the “Flex Drum Sander” be sure to turn the speed to the slowest setting.
When using the “Wonder Wheel” be sure to turn the speed to the fastest setting.
Click here to view how to fill the sanders with air, this is a very informative video provided by King Arthur's Tools
 |
Setting up the Foredom The Collets are needed to attach the sanders to the Foredom. Each set has three Collets. The two in the bag labeled A-CHA-5 are a 1/8″ & 3/32″. The 1/4″ Collet you see at the bottom will already be in the Collet Holder. There are two tapered spindles in a plastic box used for buffing. You will not need these for sanding your Intarsia projects. |
 |
Slide the Collet Holder onto the shaft of the Bench Lathe. Line up the flat edge on the shaft with the set screws. |
 |
Use the Allen wrench provided to tighten the set screws to the shaft. |
 |
Put your sander in the Collet Holder. Use the combination wrench to secure it. Insert the bar into the hole on the collet to lock the holder, use the wrench to tighten the holder. Do not crank down on it, a snug fit will do. |
Click here to view how to fill the sanders with air, this is a very informative video provided by King Arthur's Tools Inflating Model K-140 Sanders 1. Wipe the rubber bulb and the inside of the sleeve with a slightly damp cloth to ensure a good grip for the sleeve. 2. Check that the rubber bulb is centered under the cap washers so that there will be no air leakage and then check that the Allen cap screw is tight on with the Allen key provided. 3. Install the desired sanding sleeve on the drum, making sure the slightly higher side of the lapped edge is heading into the work first. This is usually in a clockwise direction. 4. It’s important to have some of the sleeve projecting past each end of the drum, to protect the rubber, and also to take advantage of one of the main features of our drums – the ability to soft sand even on the corners of the drum. 5. When fitted with a sanding sleeve, place a 1/16″ spacer/flat washer on a firm surface. Place the flat end of the drum on the spacer. This will allow the sanding sleeve to project past the end of the drum. Inflate as follows. 6. Pump carefully until you are used to the amount of air required to inflate. The strokes should be made with a small distinct thrust, especially when the sander is new. A simple pliancy test is to press the sander together using your thumb and index finger. It should be easy to press the rubber and sanding sleeve against the inner spindle. Again, it’s much faster to get the required firmness while inflating, than to pump the drum firm, and then try to release just the right amount of air by loosening the bottom nut. Often, especially if the drum has been pumped up quite firm, the air escapes much too quickly to tighten the nut in time. 7. Test the drum on a smooth scrap piece to make sure you have the right speed and that everything is tight. 8. To deflate the sander use the Allen key and un-tighten the Allen screw.
How to Inflate Model K-120 Drum Sander: 1. Center the rubber bulb under the cap washer, then tighten the Allen head cap screw with the Allen key provided. 2. On the shaft end, once again center the bulb under the cap washer, then hand tighten the hex nut firmly. If using a wrench tighten lightly! 3. Install the sanding sleeve by gently pushing the sleeve at the joined edge over the rubber drum. Use a washer or coin to allow the sleeve to slightly extend past end of the drum. 4. Place hand pump on shaft end, grip sides of the drum with two fingers, inflate while feeling for just the right firmness to match the grit used. To release air from the drum, slowly undo the hex nut until sufficient air escapes, then quickly tighten the hex nut.
Releasing Air and Removing Sleeves
Releasing air from the short and long inflatable sanders can bring about an unexpected “banging” noise. To avoid this and simplify the sleeve replacement process, proceed as follows:
Grip the sander in one hand (e.g. left) and squeeze quite hard. While doing this, loosen the nut two turns with your other hand. Using the left hand, grip the drive shaft and wiggle it to and fro. Continue to squeeze gently as the air is released. Drum, long and short sanders may also be deflated using the Allen Key.
Take care to ensure that the rubber remains under the edge of the washer before retightening the nut by hand. The sander is now ready for the next sanding sleeve.
Q: My Kirges 120 inflatable sander will not hold air, any ideas how to fix it??
A:Just follow these simple steps and it will be as good as new. First we have to establish where the leak is. Remove the sanding sleeve and give the sander a couple quick pumps of air to make it look like somewhat of a ball (photo 1), then place it in a glass of water with the stem up (photo 2). Now, look for bubbles. If there are bubbles coming out around the screw on the bottom or from around the nut on the stem end, they might need to be tightened or loosened a little. Over tightening the screw or nut can cause them to leak. The nut should be only as tight as you can get it with your fingers. The same goes for the allen screw, just lightly tighten it. Now try it in the water again. If the air bubbles are coming out of the rubber bulb then you will have to replace the bulb. We have the replacement bulbs available on the site. |
 |
 |
 |
 |
 |
 |
 |
 |
 |
 |
 |
 |
 |
 |
 |
 |
2-Remove the allen screw from the end of the sander (Photo#4).
3-Grab the rubber bulb at the stem end as shown in Photo #5 and stretch it away from the sander and pull down as shown in Photo #6.
4-Continue pulling until the bulb comes completely off the end of the sander. CAUTION- The bulb must be removed this way to prevent tearing the bulb because of the different size holes. The bulb must be reassembled in the same way you took it off, starting at the end first.
5– FIRST try this, after the bulb is off the sander you will see what looks like a piece of medical tubing in the center covering up a small hole. If you have a compressor blow through the inlet hole as shown in Photo #7. If you do not have a compressor then you can use the Kirjes hand pump and vigorously pump air through the sander to make the piece of tubing flutter. You need to blow out any dirt that might be under the tubing. Now you can use the directions later in the article to reassemble the sander and see if that solves the problem. If you test the sander again in water and bubbles still come out the air inlet end. DO THIS – SCREAM!!!!!!! Then call us.
We will send you a new piece of tubing then you can fix the sander. If fixed correctly it will be as good as new.
Replacing the tubing:
When you receive the piece of tubing from us disassemble the sander as covered earlier. Next remove the old piece of tubing but be very careful not to scratch the sander when taking it off because air might be able to escape from under the new tube. Just grab it with your fingers (Photo #8) and pull it all the way off. If you have trouble holding on to it then you can get a pair of pliers to help but be sure not to scratch the shaft.
Look at the inner part of the shaft, the area under the rubber tube, it will probably be a little rusty (Photo #9).
To remove the rust you can put the sander (without the hardware) back into your Foredom, or whatever motor you use to run the sander. Use a 220 grit or finer sandpaper and polish the shaft to remove the rust (Photo#10).
After polishing the shaft be sure to blow through the fill hole to remove the grit and dirt. Take the new rubber piece and just check to see if it fits in between the two flanges of the sander. I have found them to be a little long (they were sent to me pre cut by Kirjes). If yours is a little long you can just snip a little off one of the ends and recheck to see if it fits.
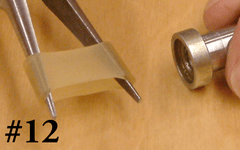
Now you are ready to put the rubber tube back on the sander. Using a pair of needle nose pliers will help spread the tube enough to get it on the sander (Photo’s #11 #12 and #13). Presto! You are ready to assemble the sander.
Reassemble the sander. Start by placing the large hole of the bulb UP (Photo #14). Now take the very end of the sander and place it at an angle into the large hole and then pull the rubber bulb up and over the end flange (Photo #15).
Slide the bulb up to the top flange at the inflation end and pull it up and over the flange (Photo #16). Now it can be put back together, but before you do, moisten the bulb at the very end where the large allen screw goes (Photo #17).
This will lubricate the rubber so the screw won’t twist or buckle the rubber. Holding the sander in your hand use the allen wrench and tighten the screw about as tight as you can get it by hand and STOP . Over tightening could cause it to leak. Now replace the washer and the nut at the other end and then tighten it finger tight (I do not moisten this end because it uses a washer to help prevent twisting the rubber).
Now you can put the sanding sleeve back on and inflate the sander. In the case it does not hold air, try the water glass test again. If it is still leaking out of the stem end just give us a call. We will have you send it back to us and we will fix it free of charge. If the bulb has a hole in it we will charge you only for the new bulb.
Q: What is the easiest way to hold the Hand Pump when inflating my Kirges Sanders??
Click here to view how to fill the sanders with air, this is a very informative video provided by King Arthur's Tools
A: The two rubber bushings that come with the Hand Pump are extras. When inflating the K-120 & K-140 we’ve found it easier to place it on a table with the stem pointing upward. Place the brass cap over the stem holding it firmly, then pump quickly. You do not want to over inflate. The best pressure is as soft as possible while still keeping the sleeve from moving on the drum. For the K-130 unscrew the brass cap and remove the rubber bushing in the end of the pump. Insert the filling shaft directly into the pump without using the rubber bushing. Then replace the rubber bushing and brass cap. Click here for a Hand Pump.

A: That’s a tough question to answer. Let’s start with the oldest video and book that we have. Our book #IT-1 “Easy to Make Inlay” is great and is our first book. It deals with Intarsia from start to end. In this book as well as V-1 Intarsia DVD we are showing a layout method which is the hand drawn method using carbon paper to transfer the different parts onto different pieces of wood. We used the carbon paper method all the time and still do use it on larger projects. It is a technique that can come in handy if you run out of pattern copies or if you do not have a way of making copies of the patterns. We do not show the technique of making of copies of the patterns to paste the pattern parts onto the different colors of wood. We were also cutting out the parts with the band saw and not scroll saw. If you are familiar with scroll saws, then that may not make much difference. Jerry’s DVD JB-1 “Scroll Sawing for Accuracy” deals only with scrolling for accuracy which is a major element for intarsia projects fitting well. Judy’s DVD JB-3 “Contouring Intarsia” touches on several subjects like the new layout method etc. and heavy on the shaping aspect. The I-172 “Horse Run” project is used as an example. It starts with a flat project and ends with a nicely contoured three dimensional horse head, sharing all the techniques Judy uses on all intarsia projects. The IT-4 “IntarsiaWorkbook”. We start from the beginning with a very simple project and work your way through to more complicated projects. It has lessons, and each lesson adds a few more elements to slowly build your intarsia skills. I hope this helps you a little in deciding which one to go with. Wildlife Intarsia is the most comprehensive book to date, it has more complex patterns. It has a wealth of knowledge acquired from years of teaching Intarsia.
Q: Can the Gel Finish (Old Masters) we use be bought in stores?
A: Yes! Unfortunately it is not widely available, but there are some paint stores and hardware stores that do carry it. You can call Old Masters 1-800- 747-3436. Perhaps a search on the internet will bring up some other dealers. If you can’t find a dealer remember that we mail order the gel in the US. Sorry, no Gel to Hawaii or Alaska and Canada.
Q: Where do the patterns you sell come from?
A: Judy designs all of our patterns. First she makes a rough sketch of the pattern, shading the parts to get an idea what it will look like using the different shades of wood. After it passes the composition/balance step the design is enlarged to scale. Next Jerry looks it over and edits it from a sawing standpoint. The pattern is then made into an intarsia piece, during the creation any modifications to make the pattern easier to use are noted on the test pattern. Next the finish is applied and the project is glued to a backing. It is studied again to see how the shades and grains work together. After all these steps the patterns are printed and made available to the public
Q: How do I stick my pattern pieces to the wood?
A. The cheapest way is by using a Scotch Repositionable Glue Stick

 |
We are using the “900” Creative Station with repositionable adhesive roll. Start by spraying a very light coat of Repositionable Spray Adhesive to stick the pattern pieces upside down to a piece of paper. The paper is a temporary way to hold the pattern sections together to put glue evenly on the back of the pieces. |
 |
Run the pattern parts through the Creative Station machine. This will apply glue to the back of the pattern pieces. (This machine can be found for a pretty good price online. If you purchase this, be sure to get the Repositionable Adhesive Refill to replace the permanent adhesive cartridge) |
 |
Peel the paper off carefully, sometimes the pattern pieces stick to the paper. Now you are ready to place them on your wood and begin sawing. |
Q: What are sanding shims and why do you use them?
A: I make a temporary shim to hold all the parts I want to sand as a unit. Please click here for detailed description.
A: Nope! Long ago we used them but have gotten away from them. We now use “mirror hangers”. These hangers can be found at Lowe’s and Home Depot as well as Kmart and Wall Mart in the picture framing section. We use a #6 x 1/2” screw with the hanger Just be sure to pre drill the hole before fastening. These hangers are also adjustable somewhat. Just snug the screw in the clamp and then if you need the project to hang a little right or left you can swivel the clamp.
Q: How do I know where to put my hangers, can this be shown on the patterns?
A: No, Everyone does not take off the same amount of wood when sanding so it would hang differently. Place your fingers on both sides of your project where you think the hanger should go. You can adjust your fingers until the piece is balanced, then mark it on the back. For framed or heavier pieces you can use two hangers along with wire for hanging pictures, this will allow you to adjust it once it is hung.

