Scroll Sawing for Intarsia
If the thought crosses your mind "is the blade getting dull, should I change it?" you should change it. Perhaps subconsciously you realize you are pushing too hard. The cost of the blade is not worth the frustration not to mention if you have to scrap some expensive wood.
 Tension: Use this link to hear that high "C" note. Ready to pluck your scroll saw blade? Listen to the sounds of scroll saw blade from too loose, just right, way too tight. It's very helpful to learn the sound of a properly tensioned scroll saw blade. Music for scrollers!
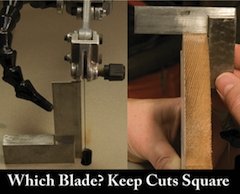
Sawing: Make sure your blade is cutting square. Check the table/blade to make sure it is square. Next make a test cut, cut a curve then check it with a square. The curve makes it easier to see any light between the square and the cut part.
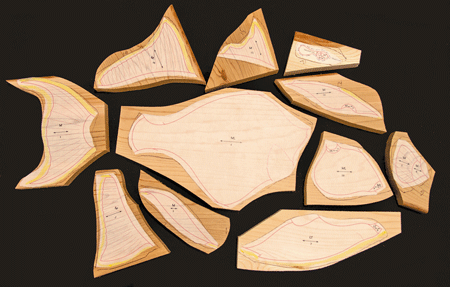
Cut the pieces about the size of your hand, this will make it much easier to handle than one large board. After cutting the hand size pieces be sure to turn them over to remove any tear out with sandpaper. The object is to keep the parts as flat as possible to ensure a square cut.
After all the parts have been laid out it is time to start sawing. If you used the same board (color) to layout many parts, start by rough cutting them into smaller more manageable sections.
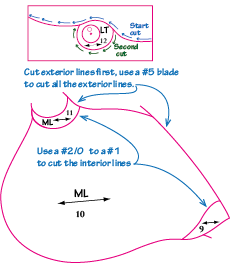
Start cutting the easiest parts first, like the outside edges. This lets you get into the swing of things. Cut some of the outside edges; parts that do not have another part next to it. I like to mark all exterior parts with a highlighter. While sawing, stop often after making a cut and remove any tear-out on the bottom side. While you're at it check your cuts with a square.

Plan your cuts: Try to make your cuts so the last cut will “drop” the part off the larger block.
Note the extra part added to the left of the eye. The last cut is a short smooth line. Drill any holes before you start sawing, like the hole for the eye.
Blade Selection: I like the Platinum Plus, Platinum, and the Pegas blades for hardwoods and the Gold blades for softwoods.
Use a #5 blade for most sawing. If you have more intricate cuts try a #3. If your wood is very hard move up to a #7 or #9 (also try applying clear packing tape on the wood).
We mainly use the blades with reverse teeth which have around 6 teeth that cut on the “up stroke.” In most cases, that will help decrease the “tear out” on the bottom side of the part.
After cutting all the exterior lines, use a smaller blade like a #2/0 to a #1 to cut the interior lines (between parts 11 and 10 in the illustration) You lose less wood with the smaller blades.

Where to Put the Blade?
When cutting a part it is best to put the center of the blade in the center of the layout line, thus removing all of the line. With more experience the goal is to leave half of the pattern line around the parts. If you are using a larger blade you will need to move the blade a little more to the outside of the line.
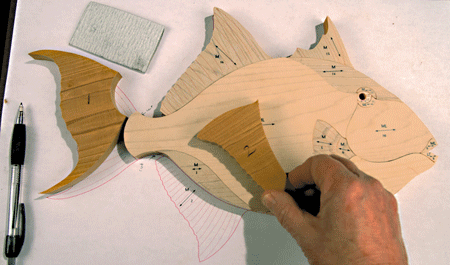
 Hand Placement: While scrolling, your hands are in control of the part. The blade is in control of the sawing. You will find that by positioning and repositioning your hands as the need arises you will be in control of your wood. Always remember to have at least one hand holding the wood down firmly on the table at all times.
Your hands will be in motion, always setting up for the next curve or turn on your pattern. Think ahead and plan your cuts.
Posture: Sit square in front of the saw making sure you are sitting at an appropriate height, so you can look down at the entire part you are cutting.
If you sit too low and are looking across the part it makes it harder to see what's coming up.
Sometimes you may find you're turning your body to allow movement of the wood, stop and reposition yourself so you are sitting straight in front of the blade.
Breath: Remember to keep breathing (I know that sounds silly). Sometimes when you cut an intricate part you tense up and hold your breath. This can make it even harder to cut smoothly. Make sure you are comfortable and take breaks as needed.
Speed: The speed (strokes per minute) we use varies from time to time depending on the material that is being cut. The main thing to remember is “control”. Intarsia requires accurate cutting, so you might want to experiment with your speed so you can get the best control. We found running the saw about 80% of the speed range on a variable speed saw works great.
Feed Rate: If you push the wood into the blade you will get a rougher cut than if you slow down and let the blade cut the wood. If you push too hard it can make your cause parts to be "out of square".
 Cutting Corners: There are different ways to cut a sharp corner (or point) it will take two cuts. You cannot quickly turn the wood, even with a small blade, to cut a sharp corner. Cut to the corner, then back up the wood, start cutting again leaving a portion of the wood. Once you cut the waste wood away, turn the part around and make the second cut to remove the small portions of waste wood.
When you cut curves, keep your cut or feeding speed constant. If you continually stop and start as you make the turn, the finished edge will be choppy.
 A magnifier really helps to see the lines. A foot switch is a good safety device. If a blade breaks or you need to stop you can easily lift your foot and stop the saw immediately.
Check for Fit: When all the parts have been cut, de-burr the back side of the part and print the number on the bottom (the same number you have on top).
Do not remove the paper from the top-side at this point. After you have numbered the back side of your project, assemble the parts and check to see how it fits. It’s a good idea to leave the paper on to see if a fitting problem could be from cutting outside of the pattern line.
If you can see the pattern lines then you will need to carefully trim the lines with a new #5 scroll saw blade. This takes some practice. If it is a free-form project practice on some of the outside edges.
How to Trim: I like to start by placing the part to the backside of the blade, this way you can get the part right next to the blade without the teeth cutting it. Then gradually bring the part around to the teeth, you'll start to hear the blade cutting. Practice barely shaving off the line.
When all the parts fit right you can remove the paper.
Remember to CHANGE YOUR BLADES OFTEN!
The kind and size of scroll saw blades can vary from one user to the next. What
works for me here in the studio may not work as well for you on your saw. I have a certain “feel” that I like when sawing and that can be different than what you like. A universal size 5 works for most intarsia projects. If I cut back into the same part to split it up into smaller sections that will go back together I will put in a very small blade size (2/0 or 0). One thing for sure (as far as I am concerned) there is not one blade that is good for everything. The blade that I use for our Intarsia on Western Red Cedar is not the blade that I use on plywood, nor is it what I would use for harder woods. I use different blades for different things. Then there is the “How Thick is the Wood”, is another factor to consider. All in all, there is only one way to figure this out. Get an assortment of blades and a stack of material and start sawing. Experience is the best way to figure this out. Below is a chart with different blades and sizes that are just a starting point. This is the actual blade combinations that we use when sawing, but the ones that you like best might differ from ours. Just remember to experiment to determine the blade that cuts best for you Another question is how long a blade will last? When the blade gets dull it will not cut well and you may find yourself pushing the wood too hard into the blade causing the cuts to be out of square. If the thought crosses your mind “I wonder if the blade is dull” it probably is. After you change the blade you will notice right away how much easier it is to cut your pieces. We can help you get started with blades but in the end you will have to decide for yourself. Below is a list of the blades we use. You can order the “OnLine” and Pegas blades on the Scroll Saw Blades Page, just click on the links.
 Tough Little Blades are a "all around blades for hard & soft woods. Quick cutting blade for all types of wood. Skip tooth; offset teeth for a more problem-free cutting of curves. Very long durability due to special hardening;
  Gold Blades are a quick cutting saw blade - works best with softer woods. Best quality; Skip tooth; very long durability due to special hardening; Reverse teeth will prevent wood splintering on the underside.
 Platinum Blades are a quick cutting blade for all types of wood. Extremely sharp teeth and a strong back for best performance and long life. The Skip tooth design for a rapid discharge of sawdust so that no blue burn marks are left on the wood in tight radius cuts. Reverse teeth prevents wood splintering on the underside.
 TMR Titanium Reverse Skip Tooth quick cutting saw blade, has a positive cutting angle which makes it more aggressive, no drifting of the cut, extremely long life due to special hardening in oil.
 TM (non reverse) has more TPI along with the positive cutting angle makes it a aggressive cutting blade.
 Platinum Plus These blades work well for medium to hard woods. This high-speed skip tooth blade, every 3rd tooth is reversed to prevent wood splintering on the underside. The tooth configuration allows for more control going thru curves.
 Q: My blade is square to the table but when cutting curves my parts get "out of square" usually the parts are larger on the bottom.
A: When you get “out of square” cutting a curve - it’s generally because you are pushing against the side of the blade. It’s a natural tendency that happens to all of us. I have to consciously remind my self to slow down, let the blade do the cutting, and any pressure/pushing I apply is feeding directly into the face of the blade.
Start cutting a curve, midway through stop cutting but do not release the piece of wood (if you have a foot switch this is much easier) turn off the saw and then let go of the piece of wood. If it shifts a little to the left or right you can see which side you're pushing against the side of the blade.
Q: How do I stick my pattern pieces to the wood?
A. The cheapest way is by using a Scotch Repositionable Glue Stick

 |
We are using the “900” Creative Station with repositionable adhesive roll. Start by spraying a very light coat of Repositionable Spray Adhesive to stick the pattern pieces upside down to a piece of paper. The paper is a temporary way to hold the pattern sections together to put glue evenly on the back of the pieces. |
 |
Run the pattern parts through the Creative Station machine. This will apply glue to the back of the pattern pieces. (This machine can be found for a pretty good price online. If you purchase this, be sure to get the Repositionable Adhesive Refill to replace the permanent adhesive cartridge) |
 |
Peel the paper off carefully, sometimes the pattern pieces stick to the paper. Now you are ready to place them on your wood and begin sawing. |

19 Responses
Judy
“I am doing an intricate snow flake scroll saw pattern where the pecies fit together to form a 3D effect should I saw the intricate inside patterns 1st before sawing the outside”
I have not cut any 3D fretwork type pieces however I like to cut the intricate inside cuts first, then the outside cuts.

donald lucien bergeron
I am doing an intricate snow flake scroll saw pattern where the pecies fit together to form a 3D effect should I saw the intricate inside patterns 1st before sawing the outside
Judy
RAY STOUT
October 18, 2020
Currently working on the oak leaf motif. Is the frame less than 3/4" thick or is the background board recessed into the back of the frame? Pattern does not mention this. Thanks for your help.
The background is the same as the backing. I used 1/4"oak veneer plywood for the background and all the parts are glued on top of that. Depending on the thickness of wood used for the leaves that overlap the frame will make a difference on the frame thickness. If cutting out 3/4" thick leaves the frame could be 5/8" thick.
Judy
DEAN TOKARSKY
October 18, 2020
In your books when a pattern is on two pages, how to get it to line up especially when you enlarge it to the size indicated?
I know, I cannot help that. I turn it in to the publisher on full sheets and they cut them in half. We went round and round about this, obviously I didn’t get my way.
Judy
Judy
DAVE LLOYD
April 26, 2021
I have a older craftsman and a shopsmith scrollsaw . I’m going to get a newer scroll saw . Is Pegas A better saw than Excalibur and do they still make Excalibur ? I’m thinking about the Pegas because of the new style clamping system . What would you recommend ?
I always recommend purchasing a scroll saw that has great customer service. The saws are so similar, the same design has been used by Pegas, Excalibur, King, and who knows who else. Before buying a saw ask “what if I’ not happy with the saw?” What happens if it has problems/repairs?"
I would look at the Seyco saw fisrst, I think they have the best customer service and a great saw.
Judy
Thanks for sharing your tips. Not sure why but when I am cutting I prefer to have the piece being cut in the the left of the blade and waste on the right. I find I can get a more accurate cut that way. I assume it is because of the blade (I always use reverse tooth). When cutting a straight line I always have the uncut wood pulled slightly to the left to keep on the line, is this normal?
That is normal, you cut at an angle for the straight lines. It used to drive me crazy because it didn’t make sense. The Pegas Modified Geometry blade is supposed to cut straighter. Most scroll saw blades are stamped out of metal wire, the stamping process creates a burr on the right side of the blade is part of the reason.

Fred Buehlef
Excellent information.

Dave Lloyd
I have a older craftsman and a shopsmith scrollsaw . I’m going to get a newer scroll saw . Is Pegas A better saw than Excalibur and do they still make Excalibur ? I’m thinking about the Pegas because of the new style clamping system . What would you recommend ?

Dean Tokarsky
In your books when a pattern is on two pages, how to get it to line up especially when you enlarge it to the size indicated?

Ray Stout
Currently working on the oak leaf motif. Is the frame less than 3/4" thick or is the background board recessed into the back of the frame? Pattern does not mention this. Thanks for your help.
Judy Roberts
“I have trouble with reverse tooth blades in that the wood tends to jump up from the “up” stroke. How do remedy this?”
You have to watch how you put the blade in. When you put the blade in, lower the upper arm all the way down, what would be the bottom of the down stroke. You should not see any of the reverse teeth above the table.
You may have the blade up too high in the clamps.
Judy Roberts
Brenda, When I am sawing I usually have the good part to right of the blade. I think it’s just a matter of what you are used to. All our blades are milled, which produces a seemingly sharper edge on the right side of the blade. The side that is sharper is actually due to a “burr” that is created when they manufacture the blades.

Lloyd Muench
I find that I should always cut with the waste side of the line to the right. I, and most people, tend to drift off to one side or the other and by cutting with the waste wood to the right, I drift away into the waste wood.

Meyer Bill
I have trouble with reverse tooth blades in that the wood tends to jump up from the “up” stroke. How do remedy this?

Diana Copper
This was awesome! Clear and simple. Love the reminders to do it right!

John Cahall
Thank you Judy! Very informative. The class I took several years ago with you was very beneficial and a great time.

Brenda Hese
Thanks for sharing your tips. Not sure why but when I am cutting I prefer to have the piece being cut in the the left of the blade and waste on the right. I find I can get a more accurate cut that way. I assume it is because of the blade (I always use reverse tooth). When cutting a straight line I always have the uncut wood pulled slightly to the left to keep on the line, is this normal?

kurt smith
I’m gonna try the highlighter on the outside of lines. I think that will help me. Great tips Judy, thank-you

Don Knox
Cutting has been a focus for me over the last two years. For me I need to remind myself, “it is okay if you need to recut a piece”. Getting close to the half line technique. Thanks for sharing this Judy ?
Leave a comment
Comments will be approved before showing up.


Judy Roberts
Author